The Symphony ISAM Manager allows you to query and modify data within an ISAM file using standard SQL-style syntax. By using Symphony data objects to map data stored in ISAM files, the Symphony ISAM Manager can display individual field elements in a grid format. Symphony data objects are code-generated classes that are built into a standard class library. Additionally, a code-generated table mapping routine is required to enable the table name being processed to be mapped to the physical ISAM filename.
Installing Symphony ISAM Manager
The installation for the Symphony ISAM Manager utility can be found at here. Download and run the Symphony ISAM Manager Installer file. This will create a program shortcut folder on your start menu called Symphony Utilities, and under this folder you will find the Symphony ISAM Manager shortcut.
Preparing to Use Symphony ISAM Manager you must first build a library of Symphony data objects that expose the underlying data structures and file information. These data objects are code-generated from your Repository structures. The minimum requirements for the Repository for code generation to work are;
- A structure definition that defines the field/data layout for how the file layout is defined. Each field definition must contain a field name, type, and size.
- A file definition that defines the physical data filename. Each file should be assigned a single structure reference.
To build the required data object class library;
- Create a new project in Visual Studio using the project template “Synergy/DE Class Library.”
- Reference the required repository files.
- Add a NuGet reference to the Symphony Framework.
- Create a script to perform the required code generation, as shown in the following example:
| Script |
|
setlocal
set ROOT=%~dp0
set CODEGEN_TPLDIR=%SYMPHONYTPL%
rem set the required repository environment variables
set RPSMFIL=%ROOT%Rps\rpsmain.ism
set RPSTFIL=%ROOT%Rps\rpstext.ism
set OPTS=-e -r
codegen %OPTS% -s <sName> -t Symphony_Data_v3_2 -o %ROOT% -n <namespace>
codegen %OPTS% -s <sName> -t Symphony_DataFieldMapper -o %ROOT% -n <namespace>
codegen %OPTS% -s * -ms -t Symphony_TableMapper_v3_2 -o %ROOT% -n <namespace>
endlocal |
Replace <sName> with a list of space separated repository structure names. Replace <namespace> with the name of the Class Library project created in Visual Studio.
-
Run the script to generate the required data objects and the table mapping routine. In Visual Studio, add all of the generated source files to the project and build.
Running Symphony ISAM Manager
Double click the Symphony ISAM Manager desktop icon. The first requirement is to define the logic the program will use to connect to your ISAM data
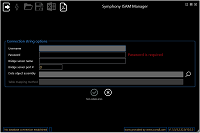
Symphony ISAM Manager
- Username (mandatory) – the user name you will connect to the data source with. If you have implemented Symphony Harmony Authentication, this will be passed through to your authentication methods.
- Password (mandatory) – the password you will connect to the data source with. If you have implemented Symphony Harmony Authentication, this will be passed through to your authentication methods.
- Bridge server name (optional) – the name of the machine or IP address hosting the Symphony Bridge Server instance.
- Bridge server port # (optional) – the port number the Symphony Bridge server is running on.
- Data object assembly (mandatory) – the class library you have created that contains your Symphony data object classes and table mapping class (see the Installing Symphony ISAM Manager section above). You can use the
 button to search the disk for the assembly file.
- Table mapping method (mandatory) – when a valid data object assembly has been located, you can enter or select the table mapping routine. You can use the
 button to select from the list of available methods in the selected data object assembly.
If you have not implemented Symphony Harmony Authentication then both the user name and password can be any value.
To define the data object assembly, you can type the full path specification or click the  button. Once you have located a valid library, the Table mapping method field becomes available. You can select the required mapping method by clicking the
  button. This will display a list of available methods:
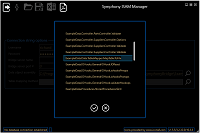
Symphony ISAM Manager - Finding table mapping routine
To select a method, highlight it and click the  button. To cancel the selection, click the
  button.
On the connection form, once all the fields contain valid data, the  button will be available. Click it to accept the entries and take you to the main screen. You can click the
  button at any time to cancel the form and close the program.
Click the  button to close the program.
Main Symphony ISAM Manager Screen
This is the main Symphony ISAM Manager screen where you can execute standard SQL-style commands to interrogate and manage your ISAM data;
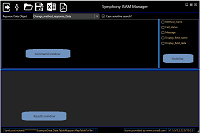
Symphony ISAM Manager - Main screen
The toolbar contains the following options:
 The Exit button closes the Symphony ISAM Manager. When you exit the program, the current command, data object selection, case sensitivity setting, and connection options will all be saved and restored the next time Symphony ISAM Manager is run.
 The Execute button runs the current SQL-style command entered into the Command window.
 Commands entered into the Command window can be saved to disk. The Open button allows you to locate stored Symphony ISAM query files and load them into the Command window.
 The Save button saves the current command to a Symphony ISAM query file.
 Export the selection results to Microsoft Excel.
 The Documentation button Displays this documentation in your default PDF viewer. This command is always available.
Below the toolbar is the data object selection list, where you can select the required response data object. When a selection is made, the available fields within the data object are displayed in the Field list.
Although the command syntax is not case sensitive, the Where clause values are. You can force case insensitivity by checking the “Case sensitive search?” checkbox.
Commands entered into the “Command” windows will be parsed and executed when you click the  button or press F5. An invalid command will result in a message box similar to this:

Symphony ISAM Manager - Error dialog
Once a valid command has been accepted and processed the results window will contain the corresponding results:
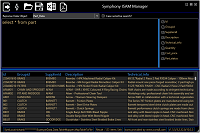
Symphony ISAM Manager - Selection results
The Field list window displays the available list of fields from the selected data object. Selecting or deselecting a field’s checkbox will include or exclude it from the results list. The command in the Command window will be updated to reflect the selected fields:

Selecting and Displaying data from your ISAM file
The Select command allows you to select and display data from your ISAM file. You can limit the fields that are displayed by defining a list of fields to select. The results can be filtered with a Where clause, and the order of the data can be changed with the Order By clause. The Select command must start with the keyword SELECT. The case of the command keywords is not important, but the case of any Where clause text values is important. You can force case insensitivity by checking the “Case sensitive search?” checkbox.
You can manually enter the names of the fields, separated by a comma, or you can select the fields from the field list. As you enter field names into the command window, the field list will update to reflect the names entered. If you select fields using the field list, the command will change to reflect the fields selected. Typing an asterisk (*) denotes all fields, and each field in the field list will be checked.
Select Syntax
The basic syntax of the Select command is:
| Syntax |
|
SELECT * | <field_name>[,<field_name] FROM table_name |
FROM table_name allows you to define the table name containing the data to retrieve, where table_name is the name of the file as defined in the repository. It is your responsibility to ensure that the selected data object is valid for the requested table.
For example, the following command selects all the fields for all the records from the supplier file:
| Example |
|
SELECT * FROM supplier |
The results would look similar to this:
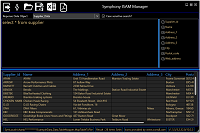
Symphony ISAM Manager - Selecting form the supplier file
You can scroll the results grid and expand the column widths to show/hide data.
The command:
| Example |
|
SELECT Supplier_id,Name FROM supplier |
Will limit the results to display just the supplier ID and the name for all records in the supplier file.
Top Syntax
The number of records returned from the file can be limited by using the TOP keyword. The syntax for the TOP keyword is:
| Syntax |
|
SELECT TOP <row_count> * | <field_name> [,<field_name>] FROM table_name |
For example, this command limits the number of returned rows to 10:
| Example |
|
SELECT top 10 * FROM part |
Where Syntax
The Select command accepts a Where clause that allows the selection of data to be returned. The Where clause has this format:
| Syntax |
|
WHERE <field_name> CONDITIONAL <value> [OPERATOR <field_name> CONDITIONAL <value>] |
Specify a field name, which must be a valid field name for the selected data object, a conditional, and the value to test for. Valid conditionals are:
|
= |
The field’s value is equal to the value defined |
|
<> or != |
the field’s value is not equal to the value defined |
|
> |
the field’s value is greater than the value defined |
|
>= |
the field’s value is greater than or equal to the value defined |
|
< |
the field’s value is less than the value defined |
|
<= |
the field’s value is less than or equal to the value defined |
|
BETWEEN |
allows the range checking of numeric values to be between two defined values |
|
LIKE |
returns records when the value is contained within the field |
Where clauses can be connected together using the AND or OR operators.
Examples of selections using a Where clause
Note that setting the “Case sensitive search” checkbox determines if a case-sensitive or case-insensitive search is performed. Alpha values must be enclosed within single quotes (for example, ‘test value’).
| Examples |
|
SELECT * FROM supplier WHERE City = ‘Manchester’
SELECT * FROM part WHERE quantity > 10 AND quantity < 40
SELECT * FROM part WHERE quantity BETWEEN 20 and 40
SELECT * FROM group WHERE description like ‘device’ |
Order By Syntax
The results can be ordered based on a field in the data object using the ORDER BY keyword. The sequence can be defined with the ASC (ascending) or DESC (descending) operators. The syntax is:
| Syntax |
|
SELECT * | <field_name> [,<field_name>] FROM table_name ORDER BY field_name ASC|DESC |
The example below shows how to order the results table in descending order of the cost_price field:
| Example |
|
SELECT top 10 * FROM part ORDER BY cost_price DESC |
Inserting new records into your ISAM File
The Insert command allows new records to be created in the file based on values passed within the command. The syntax for the Insert command has two formats:
Insert Syntax
The basic syntax of the Insert command is:
| Syntax |
|
INSERT INTO table_name VALUES (<value> [,<value>])
INSERT INTO table_name (<field_name> [,<field_name>]) VALUES (<value> [,<value>]) |
The first syntax requires that you provide all the field data values the data object expects, in the order in which the data object defines them, which is the order they are listed in the field list. Failure to provide all field values will result in an exception being reported.
The second syntax enables you to set individual named fields. The order of the data values corresponds to the order of the data fields.
Alphanumeric values must be defined within single quotes.
The table name is the name of the table in which to insert the data. It is your responsibility to ensure that the selected data object is valid for the requested table.
The following command inserts a record into the group table and sets the two field values based on the fields defined in the data object:
| Example |
|
INSERT INTO group VALUES (‘g1’, ‘Group description 1’) |
The command below inserts limited data into the part table:
| Example |
|
INSERT INTO part (id, description, cost_price) VALUES (‘id1’, ‘limited data’, 12.34) |
Failing to provide enough data for the successful creation of a record (null key values, etc.) will result in an exception being displayed.
Once the command has been successfully executed, the status bar will display the number of records inserted:

Updating existing records in your ISAM File
The Update command enables one or more fields within one or more records to be updated based on values defined within the command. The syntax for the Update command is:
Update Syntax
The basic syntax of the Update command is:
| Syntax |
|
UPDATE table_name
SET field_name=value [,field_name=value]
WHERE <field_name> CONDITIONAL <value> [OPERATOR <field_name> CONDITIONAL <value>] |
The table name is the name of the table in which to update the data. It is your responsibility to ensure that the selected data object is valid for the requested table.
The SET keyword defines the fields to be set and their associated values. Alphanumeric values must be defined within single quotes.
The Where clause limits the number of records updated in the file. For a full explanation of the Where clause, refer to the Where Syntax section above. Executing an Update command without a Where clause will result in all records in the file being modified.
Once the command has been successfully executed, the status bar will display the number of records updated:

Deleting records from your ISAM File
The Delete command provides the ability to delete records from the ISAM file. The basic syntax of the Delete command is:
Delete Syntax
The basic syntax of the Delete command is:
| Syntax |
|
DELETE FROM table_name
WHERE <field_name> CONDITIONAL <value> [OPERATOR <field_name> CONDITIONAL <value>] |
The Where clause limits the number of records deleted from the file. For a full explanation of the Where clause, refer to the Where Syntax section above. This operation is irreversible. Executing a Delete command without a Where clause will result in all records in the file being deleted.
In the example below, the record with an associated part id of ‘BB01’ will be deleted from the file:
| Example |
|
DELETE FROM part WHERE id=’BB01’ |
Once the command has been executed successfully, the status bar will display the number of records deleted:


 button to search the disk for the assembly file.

 button. To cancel the selection, click the
  button.
 button to close the program.
 The Execute button runs the current SQL-style command entered into the Command window.
 Commands entered into the Command window can be saved to disk. The Open button allows you to locate stored Symphony ISAM query files and load them into the Command window.
 The Save button saves the current command to a Symphony ISAM query file.
 Export the selection results to Microsoft Excel.
 The Documentation button Displays this documentation in your default PDF viewer. This command is always available.


